

Wondering how to connect xSocks Injector to PC via Every Proxy? Any proxy is one of the most powerful tools on the internet, allowing you to connect or share your IP address with other devices.
Details on how to connect are provided. Follow the full instructions below to connect xSocks Injector to your PC via Every Proxy.
How To Connect xSocks Injector To PC Via Every Proxy
Here is how to connect xSocks Injector to PC via Every Proxy.
1. Making xSocks Injector Ready
Once the two devices are fully connected via hotspot, follow the steps below to prepare the xSocks Injector:
a. Launch the xSocks Injector app. Make sure you have imported a valid file into the app. You can follow the “b & c” steps to import the file.
b. Right after the Settings icon, locate and click on the “Config” icon. This will display the type of Configuration you want to perform. Click on -> Import Config.
c. Now, we have to import a file that will help us connect to the internet.
d. After successfully importing the file, click on the “START” button.
e. The xSocks Injector app will be connected in a little amount of time.
2. Making Every Proxy App Ready
a. Open the Every Proxy app
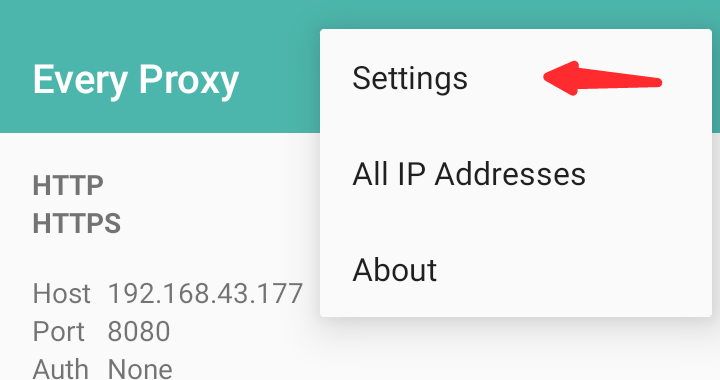
b. At the top right corner, click on the three dots and select “Settings“.
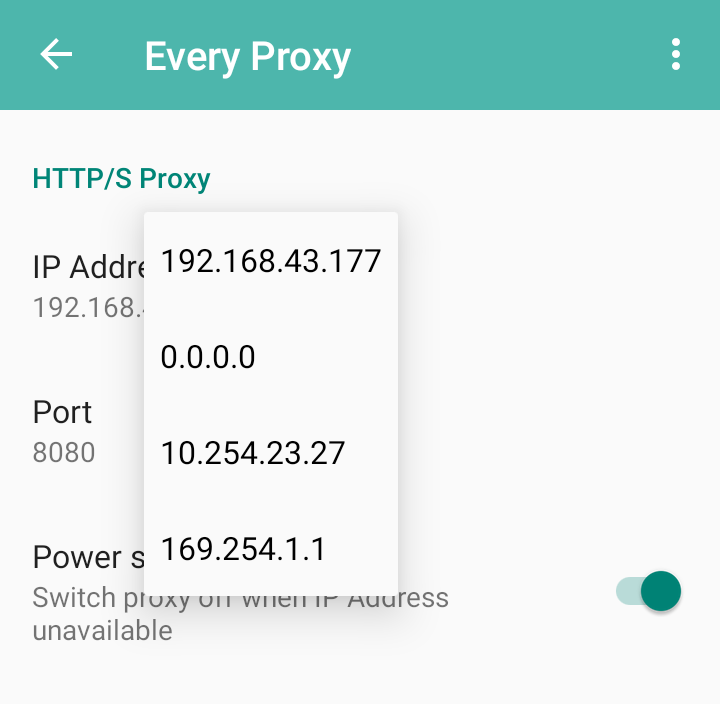
c. On the Settings page of the app, locate the IP Address and click on it. This will display all the available IP Addresses. You may choose from the list of available IP Addresses to get connected. Personally, I like choosing the very last one.
Kindly note that the list of IP Addresses below may differ from yours. DO NOT use the same Addresses.
d. Once you have selected any of the IP Addresses, go back to the previous page by clicking on the arrow at the top left corner of the app.
e. Now toggle/switch the HTTP/HTTPS button to refresh the selected IP Address you chose.
You will then see a signal, indicating a successful connection.
3. Making PC Ready
There are a few changes we need to make on the PC side. I’m using Windows 10 for this tutorial, if you are using the same, this will be a much direct tutorial for you. Kindly follow the procedures below:
a. Go to the Control Panel of your PC.
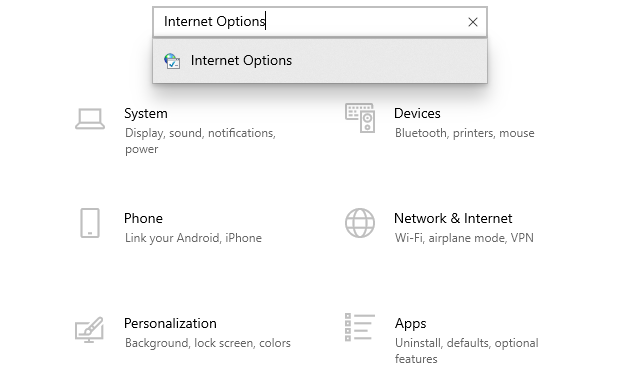
b. Click on -> Network and Internet -> Internet Options. This will open/display the Internet Properties window.
c. Similarly, you can also go to your PC Settings and search for “Internet Options” to open the Internet Properties.
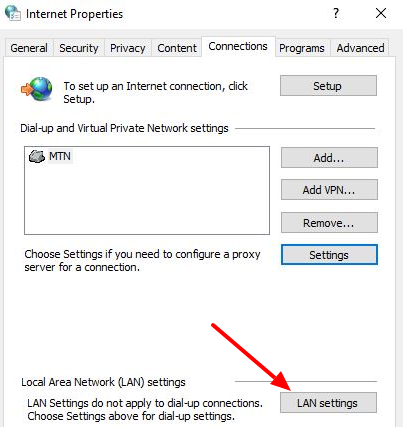
d. On the Internet Properties window, click on the “Connections” tab.
e. On the Connections tab, click on the “LAN Settings” button. Make sure to check the Proxy server first in order to activate the “Advanced” button.
f. Next, click on the “Advanced” button and make sure to “check/tick” the box that says “Use the same proxy server for all protocols”, and click on OK.
g. Now enter the “IP Address” you chose on the Every Proxy and use “8080” as the Port Number into the respective fields provided on your Windows PC/Laptop.
h. Click on -> OK and again click on the “Apply/OK” button on the Internet Properties to save the settings.
i. Make sure your PC/Laptop Hotspot is switched on and connected.
j. Now, you can launch a browser and start browsing the internet.
Congratulations! So, this is how to connect xSocks Injector to PC via Every Proxy.
In conclusion, these are the details on how to connect xSocks Injector to PC via Every Proxy. Before launching the Every Proxy app, make sure your Android smartphone is connected to your PC via hotspot.
I hope this tutorial was helpful? If you liked this article, don’t forget to share and leave us a comment.